Tuesday, September 30, 2014

Man versus Nature


Last Sunday, we spent some hours - not to my content-standing in the street, leaning against somebody's fence and trying to endure the chilly wind on our bodies, heads turned upwards, feet aching, waiting for the big moment!
Actually, all the male members of our little group had been waiting for this moment for at least a month,now! Do you want to know why? Three words comprise the very essence of their  expectation and 'deeply rooted desire' : Athens Flying Week!!!http://www.athensflyingweek.gr/).
YES !!! Thousands of people had come from different parts of our city  to watch this  big aviation event. I suppose most men and some women had been dreaming of this for days and the spectacle was really grand.
This is an annual event that aims at introducing citizens to aviation, and some of the best aviators in the world offer a unique spectacle that take people's breath away.
For me, it was also a chance to take some (I think) interesting photos where  the 'stars' are  not only the aircrafts but the magnificent beauty of  September , Attica sky with its clouds in tens of different hues of blue, white , grey and lilac -just to mention some - their strength and majestic beauty against the power of man crafted creations. Enjoy and Compare! :)


And a final photo for today, of some pink happiness, very humble but Oh so beautiful and unique in its simplicity.....
Enjoy your everyday little pleasures, till next time we meet in blogland.
Love to all,
Tina

Friday, September 26, 2014

Ideas for making lovely decorative wreaths for all seasons


I have always loved wreaths for decoration and I never cease to come up with  ideas about how to make yet another one,  when Christmas, Easter, Spring or Summer are around the corner.
But what is it that attracts me to them? Is it their circular shape which represents, among other things, unity, wholeness and completion, or just the fact that you can use them almost everywhere at home to add this special or festive touch which can easily beautify your space, at a low cost?
The answer remains unknown,  but the fact is that I have an endless obsession with wreaths, so today I decided to share with you just few of them  ,which are a permanent decorative element of my house.
 Wreath  No 1: This blue, white, beige and cream wreath may look quite summery, but I love looking at it all year round , so it welcomes me every morning when I get into my kitchen .
It is very easy to make. The most laborious part is the making of the little bird at the bottom.
To make it , you need to cut out some fabric in the shape of a little bird  , sew it and stuff it with whatever appropriate material you  have at home. Then, use some PVA glue to stick some fabric feathers on its tiny body .You can also use a little black bead  or a round piece of fabric at a suitable colour and size for its eye. This is the most special feature of the wreath , in my opinion, because it gives extra ‘volume’ to your creation. Apart from the little bird , you can make small fabric mushrooms, hearts and  little houses . I have here used a wooden heart in white colour, two small wooden houses and letters in different hues of blue , to form the word ‘Home’.
 After I had glued the decorative elements on the wreath , I  used a length of  blue and white  fabric to wrap it around the wreath . This ‘ribbon’ adds some extra colour to it  and ‘completes’  it in a way.
Wreath No 2 : I used the same method as the one I used for the first wreath, but  I made some fabric  fish instead of birds and also painted some sea urchin shells, which I found on the beach. The painted sea urchin shells look great when you add a coat of acrylic paint on them and they are fantastic for using on a summery wreath. I also added some tiny pieces of drift wood and starfish (real and plaster ones) .Instead of a fabric ribbon , I used some lengths of raffia . They give a country style look to the wreath.
Wreath No 3 : The easiest and fastest to make at no cost at all.
Use any twigs  you may get from a garden , make a circular shape , tie them in place using some raffia and add little bows  made of fabric in different colours and texture   . You can add some colourful buttons and little hearts, which  you can hang from the wreath using raffia.


Here you are!! You  can have a new wreathe for a wall on the balcony or  the front door at no time at all.

Thank you for reading dear readers and I wish you a lovely , creative  weekend. The weather in Greece tomorrow will be quite cold and autumnal but I suppose it was about time. 

Till next time , 
Tina 

Tuesday, September 23, 2014

Ideas for making your own jewellery!


Hello dear readers!
Today is officially the beginning of autumn and since we are spending more time indoors, why not occupy ourselves with something creative and useful.  So, I will give you some easy ideas about how to make your own, inexpensive but unique pieces of jewellery. Actually, you are not going to make them. You will put different materials together, use your creative imagination and create something of your own.
The idea is either to use material that you already have at home or buy some, at low prices and combine new and old stuff to come up with something lovely, modern  and ‘new’.
Let’s get to work then.
Open your jewellery boxes, paper boxes, drawers etc. where you keep old jewellery ,  chains , pendants, old beads  in different sizes, colours and materials , various pieces from old earrings, broken bracelets, necklaces and so on  and think of how you can give them……… new life!
(The idea is that we don’t throw old stuff away. I’m talking about things that you like, because of their colour, texture, shape, pattern, material etc. Keep them and one day they may prove a little ‘treasure’.)
If you want to combine old with new, there are a lot of shops who sell fantastic stuff for making your own jewellery , like beads, chains, pendants, waxed strings in different colours etc. etc.

Today, I will give you three different ideas for necklaces that will attract attention!
For the first one you will need :
1. a lovely flat ‘bead’  in the colour of the sea and the sky
2. a blue or turquoise tassel,
3. a small silver bead
4. waxed string in blue or black colour
I call this necklace ‘summer time memory’ because of its colours.
Of course, you can pick the colours you like.
First pass the string through the loop of the tassel and then, use both ends of the string and pass them
through first ,the holes of the big bead and then, through the hole of the silver bead .
Finally, tie a knot to secure the two ends of the string and you are ready. Voila!!
Isn’t it nice? It reminds me so much of summer time and the sea ...

 The second necklace doesn’t require any skill at all. Just use an old silver chain that you have and probably never wear these days and buy an eye catching pendant to wear it with.
 I chose this elephant in silver colour (at a very low price -1 Euro!!) .The elephant is the symbol of strength, wisdom, kindness, beauty and power and it is supposed to bring good luck. I don’t know about good luck, but I like him (or her?)!
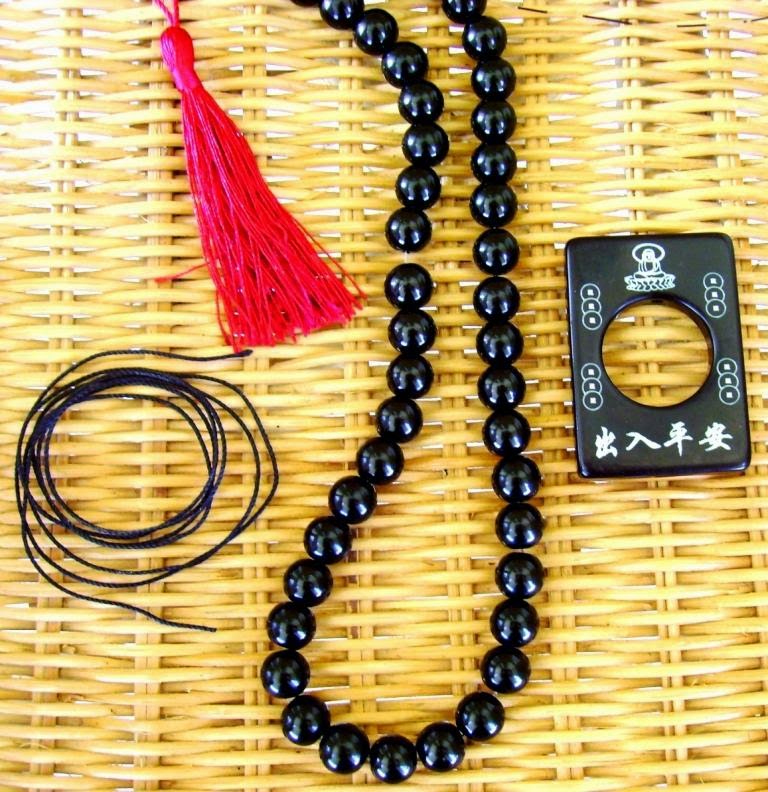
 For my third idea you will need:
1. a pendant inspired by the Orient
2. a red tassel
3. about 65 beads in black colour (or less, if you want your necklace shorter)
4. 1 m of waxed string

Again, you start by passing the string through the loop of the tassel and then both ends of the string through the holes of the pendant .Then, pass the string through the holes of the black beads  at both  ‘sides’ of the pendant. Tie the ends of the string with a knot. Add some PVA glue on the knot(s) to secure it in place.     
                                
   So here you are!! You can make a number of ‘new’ necklaces by spending almost no money.
The idea is to up cycle things and be creative!!
I would be very glad if you try my ideas and write to me about it.
Till next time,
My love to all of you and particularly to……… a sweet boy!!
Love,
Tina


Saturday, September 20, 2014

Moments of happiness

Sometimes  , those moments  appear out of the blue, as you are walking back home from work or while you are doing your everyday shopping , that make you stop and  breathe in quietly and happily. When  an image , a sound  or a smell attracts your attention and keeps it focused for some seconds, eliminating  anything else around you.
These unique moments when you become aware once again of the beauty of the natural world  and how soothing and healing it is for your soul and mind.
Yesterday after work, I was walking  , my mind occupied with various thoughts  , when suddenly, I turned my head upwards and I saw them ! Tens of birds perched on the electrical wires above my head. I stopped to have a better look . What a beautiful  , sweet sight.

I always like the view of birds in the wires, waiting for their next move. I don't know what attracts me, but I suppose it is a childhood memory of  an abacus , a lovely present, with which I learnt how to count .  This wasn't an ordinary abacus, because it had tiny black swallows instead of beads and you 'counted' them. The swallows were 'perched' on the wires and you moved them to the direction you liked. I adored it for some strange reason and it was one of my precious possessions at that time.
Anyway, I don't know if the birds I saw yesterday were swallows ready to migrate  , although I think they were pigeons but they certainly made me smile.
 I ended  this walk back home with a visit to the open air market in my neighborhood and another beautiful sight caught my eye. This bunch of flowers on the florist's stall was calling me! And who am I to resist it?
 So , finally back home, with pictures of the birds in my camera and  flowers in my arms , I was happy it was Friday afternoon and  the weekend finally started .
Have a lovely weekend.
 Love ,
Tina xxxxx

Tuesday, September 16, 2014

Gifts for children birthday parties guests

Handmade, personal gifts are always welcome by both children and adults.
They have this special touch of care and time that you spend to please a friend or someone that you invite to celebrate together a special event, such as children birthdays.
I will give you here today, an idea which proved to be quite successful with a number of little ladies who were invited to wish ‘happy birthday’ to their 11 year old friend: Small decoupage ‘paintings’ on tiny easels. 

HERE IS WHAT YOU NEED TO MAKE YOUR GIFTS :
1. A number of tiny white canvases and wooden easels. You can find them at some art and hobby shops and toy shops.
2. Some paper napkins, colourful and bright, with girly patterns.
3. Decoupage glue for paper (you find them at all art and hobby shops)
4. A pair of scissors 
5. A paint brush
6. Some acrylic or water  colours
7. Some small pieces of sponge
8. Decoupage varnish (optional)


 Step 1: You cut out the pattern you want to use for your decoupage and remove two layers of paper from the napkin. You are left with only the top layer where the pattern is.

  Step 2 : After you have cut out the patterns you are going to use , arrange  them on the canvases. You may need to spend some time deciding on the most appropriate arrangement of patterns. Also, you may need to use patterns from different napkins.
 Step 3 : Place the first cut out on the canvas and glue it on place using the paint brush. Start from the centre and move outwards. Make sure you don’t press it very hard because you may tear it.
Then, you glue the rest of the patterns , till you get the result that pleases you.
IMPORTANT NOTE: Make sure that you brush the paper evenly on the surface of the canvas so that no ‘bubbles of air’ are created and the final outcome is smooth and even.
 Step 4:  Put a very thin layer of acrylic or water paint on the pieces of sponge and use it to add some colour to your ‘painting’.The aim is to make the different patterns of the napkins blend together and the contrast of light and shade to give a better ‘depth’ to your decoupage painting .Don't add colour directly on the patterns. The colour should be used where the white areas of the canvas are .  

Step 5: When the decoupage is dry (use a hair dryer for faster results) apply a coat of varnish to give it a better final touch. 


Optional : you can embellish the canvas with small buttons and/or ribbons or small pieces of fabric or even lace , if you think it suits your little creation.
Step 6: Place the gifts on a table or shelf in the room and invite children to choose the ‘painting’ they like the most. This will give them more pleasure than you deciding what each one will get.
Step 7:  Make a delicious birthday cake and enjoy the day!!

I hope you like my idea and you give it a try!

Many kisses and love to you all , till next time,
Tina xxxxxxx